Thursday, December 30, 2010

The Liberalarium and other news

Now that the midterm elections are over with, we dread the creeping conservatism that is bound to take over the country.  Thus we are renaming our conservatory to now be called the liberalarium!  This name is more befitting for a household of bleeding heart, tree-hugging, animal whispering, left wingers.  So it's not a greenhouse, an orangerie or a conservatory; it's a liberalarium!

On to other news.  The interior is shaping up nicely, but we are holding off posting pictures since the work is proceeding on several fronts and no one room is completely finished.  Stay tuned.

The conservatory liberalarium! is now wired for electricity (as are the garden walls) and it has the southern skylights installed.

The skylights being installed on the liberalarium.

Trim and tile work are proceeding well and there is a lot of both.  Here's a picture of Isabel enjoying a dog toy on the tile being used for the shower floors:

Isabel on the shower floor tiles.  They must be pretty comfortable.


We also had three celebrations over the last few weeks.  Jason had a birthday, Scott had his birthday and of course we had a Christmas surprise one morning.  Here are the pictures (sadly there isn't one from Scott's party, but he's young enough to have many more):

Happy birthday for Jason (sorry he's blurry)


The Stylecraft crew the morning after a visit from Santa Claus.  
Back row:  Bruce, Sergey, Scott
Seated in front:  Jason
Jason's blurry again (hmmmmm, makes him seem kind of shady!)


Onward and upward,
Mark, Mark & Isabel

Wednesday, December 8, 2010

Planet Mark and Project Updates

Jason, the builder, now calls our project "Planet Mark" in reference to the complex of structures associated with the main house.  Here's a view illustrating what he's talking about:

The main house, garden walls, conservatory, pond, rain garden and garage of Planet Mark.


Here are some pictures to update you on the project's progress:

The conservatory walls.


The conservatory with its roof.  Yes, that's the darkest conservatory you may have seen, but the glass skylights 
still need to be put in.  Wait and see.


The pond and rain garden area.  The wooden structures are the supports for the plank walkways.  The pond hasn't been filled in this picture.

Another view of Planet Mark.


Onward and Upward,
Mark, Mark & Isabel

Monday, December 6, 2010

The Great Wall of Dolman

A couple of years ago we visited China and walked up a long section of the Great Wall.  Here's what it was like:

The Great Wall of China.  You get a Hero card if you make it to the top of this section.


And here's the kind of thing you see along the way:

A formal garden near the Great Wall of China.


Well we don't have the enforced labor of thousands of Chinese nor do we have several hundred years, but we are building two walled gardens as part of our project.  The idea is that they will form two courtyards off the south side of the house.  One comes off of the living room and the other comes off of the library.

Here's the first picture, I will chronicle the building of these walls as they progress:

View from front of the garden wall forms before concrete is poured.  The chalk lines 
are 3 shuttered windows that will be put in after the concrete is poured.


View from the roof next door showing the two walled garden rooms that will be created 
when the concrete is poured.  The one toward the street will be the English cottage garden 
and the other one will be the more structured eating area.

And yes, we know they can only be 6 feet high according to the historic code.  Give us some time to finish them and finish grading the land.  I think the results will be quite pleasing.  The courtyard room off the library is going to be an informal English garden and the one off of the living room will be a more structured area for outdoor eating.


Onward and upward,
Mark, Mark & Isabel

Colonel Mustard in the Conservatory with the Candlestick

Get a clue!  We realized we were re-creating the popular board game by building a library and now a conservatory in this wildly complicated project.  We're considering the conservatory to be our project's crown jewel.

I will chronicle its construction in much the same way I showed different pictures of the main house as it went up.  Here's the first picture:

This is a view of the conservatory foundation wall.  The conservatory is attached to the back of the main house.  The doors shown above will lead into the conservatory from the house.  There will be a set of french doors in the middle of the wall in this picture that lead out to the rest of the yard.


Dear Mark,

Isn't a conservatory a bit snooty?  Wouldn't it be less haughty to just call it a greenhouse?

Sincerely,
A member of the unwashed masses


Dear Unwashed,

You need to pick up a book once in a while.  I believe a greenhouse is a structure devoted to the raising of plants, very often veggies or annuals.  Such a structure is designed to provide the best environment for plants.  An orangerie (that's o-ron-gery) is an example of a greenhouse built at the turn of the century (that's the 19th century) that allowed folks to grow citrus fruits in cold climates.  A solarium is the kind of structure people build that provides an environment mostly conducive to humans.  But a conservatory is the best of both worlds in that it is designed to accommodate plants and humans (and dogs).

Sincerely,
Mark, the not-so-high and mighty


Our conservatory is designed after the Linnean house at the Missouri Botanical Garden.  This is the structure immediately to the left after you first enter the garden from the main building.  Currently it's under construction, but is ordinarily where they house the camelias.  Our idea is to be able to have a garden all year long and enjoy the fragrance and sight of plants even in winter.

In my mind our conservatory will be the perfect place for breakfast cooked by the maid and served by the butler.  Whooops, looks like we are getting a wee bit uppity.


Onward and upward,
Mark, Mark and Isabel

Wednesday, November 17, 2010

Achin' in the rain

We started out singin' in the rain and ended with achin' in the rain.  Rain garden that is.  Yes, believe it or not we have another eco project going on around the crib.  The nice weather has again helped us to start on another outdoor project.  Mark and I are even helping with this one (shocking and a bit scary).  We did much digging, rock moving and liner laying.  Surprising how we could do this in the past without a lot of trouble.  Not so much anymore.  Now it's work, whine, wince and then wallow in agony with a whiskey.  But with the help of Scott Woodbury from Shaw Nature Reserve, his friend and Scott Powers of Stylecraft Homes (one of the amazing crew members working on the house) we have a really good start on a rain garden.

The idea behind this rain garden is that it will absorb rainfall instead of having the water roll off the land and enter the sewer system.  We are also connecting some of the downspouts from the house, our garage and the neighbor's garage to the rain garden system.  That way even that water, which ordinarily barely even touches any ground, also will not enter the sewer system.  We don't have the system set up to be used as irrigation, but in the future we plan to add some sort of storage system that will fill with rainwater from the other downspouts not used in the rain garden.  That stored water can then be used for irrigation.  We probably won't use rain barrels, because they only hold 50 gallons and we would need a lot of them to really make a difference.

Our rain garden will receive water from rain falling directly on it and from the downspouts.  The downspout water will flow through a tube and bubble out like a natural spring.  It will then flow down a stream bed and into a pond.  The pond itself will have the capacity to hold a large percentage of the water from the downspouts during an average rainfall.  But if we have more rain or frequent rain, the pond will overflow into the rain garden planted next to it.  This pond and rain garden system will have the capacity to absorb the rain that falls on it directly plus 60-70% of the water that hits the roofs of 3 buildings.  It will do this even for a 2 inch rain event, which is twice the normal, average rain fall amount.  Then finally, if we have even more rain, the water will flow from the rain garden through a pipe to the sewer system.  That should be a pretty rare phenomenon.

Sorry to disappoint those neighbors who thought we were putting in a swimming pool!  Here are some pictures:

A view of the pond.  The spring that is fed by the downspout water is out of the picture to the left.  The wooden structures to the left and right will be boardwalks that will allow us to walk over the stream (on the left) and through the rain garden (on the right).


Here's an example boardwalk from the Japanese garden at Missouri Botanical Garden 
that resembles what we are trying to build.


Pond filling ceremony using a bottle of spring water.  A hose will be used for the rest!


Our first pond visitor.  A fearless Robin made a foray to the water's edge only minutes 
after we started filling the pond.


Onward and upward,
Mark, Mark and Isabel

Monday, November 8, 2010

Can you believe this weather?

The springlike autumn we are having has been helpful since we fell behind a wee bit on the outside work.  On the south side of the house there will be two stucco walled garden rooms.  From the inside we can access each of these rooms and from them we can move into the rest of the yard.  One will be planted as an English cottage garden (think roses and lots of flowering plants, a little bit of messiness and lots of color and fragrance).  The other will be more Mediterranean (think tile, fountain, neat beds of plants) and used as an outdoor eating space.  We had to hold up the construction of the walls to get approval from the City (yes, we had to go back again).  Then we were further delayed as we waited to get the exterior geothermal system hooked up.

Exterior tubes of the geothermal system buried in a trench about 4 feet under ground.

The picture shows part of the tubing that is buried in a trench.  Toward the top of the picture you can see the tubes curving downward as the enter the well hole that was drilled to take them 200 feet into the Earth.  There are a total of 4 such holes.  A pair of tubes enters each hole, one tube takes water down into the Earth and the other tube brings it back up to pass on to the next well.  After the water flows through all 4 wells it can then enter the house and be used by the geothermal heat pump unit to heat or cool the house (see an earlier post for an explanation of how the system works).  We just learned today that the solution in the tubes will be a mixture of about 85% water and 15% methanol (the same alcohol that is used in that blue liquid you squirt on your windshield).

There's not much to show on the garden walls yet, but the next week should bring some progress in that area.

Onward and upward (or in this case, downward),
Mark, Mark and Isabel

The walls are up and the floors are down.

We are ecstatically happy because the drywall is up.  It's amazing how fast that happens and totally awesome that it makes the house really look like a place you want to live in.  Drywall can contain differing amounts of flyash (the burned residue from coal-based power plants).  I believe someone told me that all drywall contains at least some flyash.  The use of flyash is a way to turn a waste substance into a useful product.  We elected to not use a high flyash content drywall because we were concerned about heavy metals contaminants.  So the drywall isn't as green as it could be, but in terms of IAQ (Indoor Air Quality) we think it's better.  This is another good example of how going green isn't a kneejerk reaction; it requires you to balance several factors.  Sometimes one green aspect (use of flyash) can conflict with another green component (IAQ).  Queue Kermit the Frog, who famously said, "It isn't easy being green."

Isabel guarding the drywall.


Also recently completed are the radiant floor tubes.  The whole house will be heated with radiant floor tubes.  This is the same principle as a radiator that sits against the wall in many old houses in this area.  Hot water, produced by the geothermal system, flows through the tubes in the floor and releases its heat into the room.  From science class you may remember that heat is transmitted in 3 ways, radiation energy from a hot body (not Angelina or Brad), convection (the heating of air) and conduction (contact between your body and a heat source).  Radiant floors will transmit heat using all 3 of these ways, thus partly explaining its efficiency.  Of particular note is the conduction transmission of heat.  Unless you stand right on top of a floor register or next to a radiator, you don't experience conduction in most homes.  In this home heat will be conducted to anything that touches the floor.  This means the furniture will be warm, we will be warm and even toilet seats will be toasty!

The radiant tubes for heating the house are laid over 
a moisture barrier which is resting on the wood subfloor.  This picture
also shows some of the drywall, plumbing and electricity in place.

An important aspect of the radiant floor system is the use of a lightweight concrete under the brand name Elastizell.  By using this concrete we get the best possible transmission of heat from the radiant floor tubing into the room.  You can leave the concrete as the final surface or you can put carpeting, tile or wood over it.  Tile and wood don't affect the heat transmission very much, but carpeting tends to block some of the release of heat from the tubing.  We will be using tile, wood, marmoleum and cork coverings.  Of all those coverings, cork is the one that might block some heat transmission.  Go to this website to learn about Elastizell, including its sound deadening and fire blocking qualities:  Elastizell Floors

In this picture you can see the same room from the picture above, but now
the Elastizell concrete floors are poured over the radiant floor tubes.


Onward and upward,
Mark, Mark and Isabel

Tuesday, September 28, 2010

Our House Sucks

Such a shocking statement after not having posted for quite some time.  Well it happens to be true, our house does suck.  As of this week we have installed the central vacuum system.  That sounds like a luxury and may turn out to be so.  But the real reason we put it in has to do with IAQ.  That's Indoor Air Quality, a very important concept in a green, eco-friendly home.  Most vacuum cleaners will put some dust and allergen particles back into the air as you go about "cleaning".  With a central vacuum the collection of the dust and dirt is done at a central canister located in the basement.  The design of this canister includes high efficiency filters and a moveable stopper all of which keep dust from returning into the air.  Furthermore we located the canister in the mechanical room in the basement which is walled off from the rest of the house.  The biggest downside to a central vacuum system is the 30 foot hose that comes with it.  Where do you store such a thing?  BUT the biggest and mostest funnest part of the system is the toe-kick port under the mudroom cabinets.  You just sweep up a mess with a broom, push it toward the port, open it with your foot, the vacuum system comes on and you sweep the nasty beasties from the dog's paws or whatever else is on your floor right into the port.  Poof!  It's gone.
Check out this website on our central vacuum system:  Central Vacuum
Here's a little video on the toe kick port that I'm deeply in love with:  KickSweep

Other IAQ measures we're taking include the use of bio-based insulation, low VOC (volatile organic compounds) paints, glues, sealers, etc., no carpeting which can hold onto dirt and allergen particles (although we will have some rugs), an energy recovery ventilation system (see an earlier post), no ignition source (no fireplace, no burning of fossil fuels for heating air or water) except for the cook stove which is gas because we just can't deal with an electric stove.  Oh, and plenty of windows.

Back to why we haven't posted in a while.  We took a vacation, one of us got sick and then so did the other.  Now that we are more functional, posting can proceed.  Even though we haven't posted, much work has been going on.  The garage is nearly finished, the basement floor is finished, the windows are all installed and most of the doors too.  Electrical wiring and plumbing are nearly finished, making the place almost ready for drywall.  Before the drywall goes up we had the last layer of insulation installed today.  To refresh folks, the walls are made up of several layers.  From the outside moving inward, there are these layers:  brick, 1" rigid, closed cell foam (with all the seams taped), the Zip system watering proofing (again with all the seams taped) mentioned in an earlier posting, the actual framing timbers are next, then the cavities between the framing boards contain 2" of bio-based spray foam insulation that seals all the cracks, then today they sprayed in a 4" thick layer of cellulose fibers (old newspapers and blue jeans) and then finally the drywall.  The calculation on our walls gives us an R value of 35, pretty darn good.  The roof which is also the ceiling on the second floor will have an R value of 70.  A value that's practically through the roof!

Jay Anderson insulation from Illinois did the bio-based spray foam and the blown in cellulose fibers.  His comment was that this is the most insulated house he's worked on.  One measure of that is how quiet it is inside.  We should be able to hear those utility bills dropping.

Until next time we are moving onward and upward,
Mark, Mark and Isabel

Friday, August 13, 2010

Bricks and Mortar

Today's entry is short, but solid.  We're going to quickly get down to the real bricks and mortar.  Literally.

The most exciting thing in this past week has undoubtedly been the work of the bricklayers from Harlan Brick (followed by putting in more windows as a close second).  The bricklayers are surprisingly fast and we really appreciate them working during the hottest days we've had around here.  They got a couple of reprieves from rainstorms, but that also made it too dangerous to work on metal scaffolding, so they didn't during the storms.  Rain also made everything icky.  I'm afraid the soil surrounding the house is a disaster, so I'm getting advice from a lot of horticulture people on how to best deal with rejuvenating the soil structure after the big machines are gone.

Here are a few pictures to illustrate why we are so excited.  The pictures are of the south side which took only 2 days to complete.  They are now finished with the west and north sides as well.  The only remaining side is the front which should be finished early next week.

Installation of the scaffolding.  The green boards behind the scaffolding are another layer of insulation which has all of its seams sealed with tape.  From the brick inward we have a small air space, then the green panels seen here, then the green Zip system sheathing boards attached to the stud walls, then 2" of bio-based spray foam insulation, then 4" of blown-in cellulose insulation.  The walls will have at least an R-35 rating.


About half of the brick up on the south side.  This happened in 1 day.


The south side is completely bricked in this picture.


A view of the south side after the scaffolding was removed.  The small windows in the upper left corner are part of a 4-season room.  Wood siding will be put on around those windows.


Close-up view of the brick and mortar we used.  The brick is made to look old (on purpose!).  We didn't want the house to look neat and perfect, we thought it would be better to have it look like it has been here for 100 years.  The mortar color was chosen to match the trim around the windows and doors.


This is a detailed view of the brick pattern just under the parapet wall (see the upper right of the second photo up).  Jason the builder surprised us with this pattern.  It's the Roman numerals IX and I, in other words, 9-1.  This is the date we count as our anniversary, 25 years ago.  How's that for an anniversary present?


Thank you Jason, we'll contact you in another 25 years to build us a golden anniversary house.

Onward and upward,
Mark, Mark and Isabel

Monday, August 2, 2010

A ton of updates

Construction is in full swing and I really can't keep up with the daily changes.  Here are the highlights from the last week or so:

Garage:  The garage shell is finished, it just needs to be made pretty.  Sadly, we aren't going to put brick on the garage because we spent big bucks to put brick on all 4 sides of the house.  The garage will have wood paneling with some detailing.  The roof will be architectural shingles (they look fancier than ordinary shingles in case we ever look down upon the garage).  Placement of the garage came out perfectly and it doesn't look like a monolith in the back yard.

Garage exterior before finishing.  Believe it or not you are also looking at the future 
herb and vegetable garden.  Incidentally, we will actually have indoor plumbing, but as a courtesy
 to the builders, we now have a lovely green porta-potty.  So far 2 homeless people, one drunk person 
and one City worker have been grateful for a spot of relief.

Roof:  We now have a finished roof.  It is bright white to reflect Sunlight away from the house.  In technical terms, the roof has a high albedo (NOT libido!).  It will act in a fashion similar to snow by reflecting away light and thus heat.  In the super hot weather we've been having, everyone who goes upstairs remarks how cool it is.  Ordinarily it would be quite toasty upstairs.  The roof also slopes from the front of the house to the back at about 1 inch per 10 feet for water to drain away.  Additionally there is a layer of foam insulation under the roof material.  When you add up the insulative power of this foam, plus the interior insulation, our roof is rated at an R-70!!  That's very high and is like wearing a stocking hat, scarf, hood and space helmet.  Plus, the white rubber material that coats the roof is a recycled product.

White roof made from recycled rubber materials.  Under this membrane is foam insulation.  On the interior is more insulation, giving us a roof R-factor of 70!  This is a very high level of insulation.

Wall Insulation:  Our walls are getting a lot of attention too.  In the next couple of days 1 inch of rigid foam panels will go up on the exterior walls.  If you remember we had that on the basement walls earlier.  Then on the inside of the walls we are having 2 inches of spray foam insulation to insulate, but more importantly, it will seal cracks all around the house.  We are using a bio-based spray foam that isn't made from petroleum oils, but instead is composed of plant oils (like soybean oil).  Then the rest of the wall cavities will be filled with blown in cellulose fibers (from old newspapers and blue jeans).  This cellulose goes in damp to help it bind to the spray foam and to again fill in cracks, it will dry, be trimmed and then the wall board can go up.  And don't forget about all of the black tape going on all of the exterior cracks  (see the photo above).  We have been repeatedly told that thick insulated walls are one thing, but sealing cracks the way we are is mega intense insulating.  Our walls will have an R-35 rating.

Bio-based spray foam insulation in the walls.  There is 2 inches of this and then 
4 inches of cellulose fibers will come later.

Waste wood:  Jason and his crew are conscious of our goal to reduce construction waste, so they are constantly using boards from the main house in other applications.  We used leftover wood pieces for the garage structure, we will be using leftover foam insulation panels to make cold frame boxes for the garden, and the picture below shows how they used extra wood to create fire blocks in the wall cavities (a fire would have to burn through these blocks before it could get to the second floor).

The horizontal pieces of scrap wood are in place as fire blocks in all of the first floor wall cavities.

A peak at the next week:  Scaffolding was put up on the south side of the house so that the black tape could be put in place and then the rigid foam insulating panels, then the windows and finally the brick.  That's a lot, but it starts to go quickly once they get going.  The scaffolding will move around the house and the same order of materials placement will repeat (black tape, foam panels, windows, brick).  We also have the electricians and plumbers working inside.  Holy cow, how do I blog about all of that?

Scaffolding in place to finish the insulating, install windows and bricks.


Onward and upward,
Mark, Mark and Isabel

Come and listen to a story about a man named Jed

He's a poor mountaineer, barely kept his family fed, then one day he was shootin at some food and up through the ground came a bubblin crude.........

Black gold

Texas tea

Limestone, huh?

Insertion of the geothermal heat transfer tubing into the wells.

We didn't hit oil like Mr. Clampett, but limestone we've got plenty of.  Sorry to any neighbors who were bothered by dust during drilling.  If it ever rains the dust should wash away.  Our problem is a bit more dramatic since we have 4 piles of soggy rock dust, mostly limestone.

All of this activity is for the geothermal HVAC system.  The next stage is for a trench to be built that will accommodate the geothermal tubes and allow them to be linked together in a big loop.  This trench will be filled with the limestone dust and then soil removed to dig the trench.  Geothermal heating and cooling is one of the most important aspects of this project.  With this system not only do we get a very efficient system, but it is almost completely pollution free.  The only energy required is for pumps and fans.  We don't need to burn anything.  And the energy for the pumps and fans will be coming from solar panels!  All of this reduces our carbon footprint pretty close to zero.  And did I mention it's pollution free?

Our system is based on the fact that the Earth is a constant temperature (of about 55°F) at 200 feet down.  We drilled 4 wells, each to that depth.  This gives us a 5 ton system for cooling and a large heating capability.  Into each well is inserted a loop of tubing which is then surrounded by a type of grout.  This puts the tubes in contact with the Earth where heat can be exchanged.  We either release heat to the ground in hot weather or we take heat from the ground during winter.  Inside the tubes is a fluid based on a glycol compound (a safe version of the anti-freeze in your car).  This fluid warms up or cools down, depending upon the season, as it passes 200 feet down the tubes.  The tubes are connected in a loop to allow the fluid to circulate back up to the house.  The whole system is ridiculously simple and trouble free.

When the fluid circulates back to the house it will go into a heat pump which will extract heat from the fluid during winter and release heat to the fluid during summer.  Explaining that process reminds me of physics lectures, but you can look it up on the web at Wikipedia:  Heat pump physics.  Suffice it to say that you have a heat pump in your kitchen, most people just call it the refrigerator.

In our whole house geothermal heat pump, the fluid itself never leaves the tubing, it stays within the system to be circulated back down the wells.  But before it goes back outside it passes through a set of tubes contained in a giant water tank.  The heat the glycol fluid contains is transferred to the water in this tank when we're heating the house (or for cooling, heat in the water tank is transferred to the circulating glycol fluid).  Then the warm water in the tank is pumped to the radiant floor system in the house and we are thus warmed.  For cooling the cooled water contained in tubes will pass by a fan that will blow air across the tubes.  This cooled air then goes into the house and we are thus cooled.  The system is known as a water-to-water system (really it's glycol fluid-to-water) because the fluids are used as the medium for energy exchange.  Here's a diagram that takes me a bit of effort to digest:


Our system is so efficient that as a side benefit it will also make all of our domestic hot water and store that in another tank, separate from the one used for heating and cooling.

Combine all of that with zoned heating/cooling, a solar panel system, and we should have an HVAC system that doesn't compromise comfort while being energy wise.

What about the "V"?  The industry term we've gotten used to is HVAC which stands for "heating, ventilation, air conditioning".  One of the things that comes up when building an energy efficient home is indoor air quality (IAQ).  A big component of IAQ is ventilation, the "V" of HVAC.  Our house is so heavily insulated and sealed that we need to be careful to maintain good IAQ.  We aren't burning anything (except a wee bit of gas during cooking when we're not just microwaving leftovers), but the air can still become spoiled.  So we have an energy recovery ventilator (ERV) as part of our HVAC system.

Even animals have sort of a biological energy recovery system.  Take a snowshoe hare for example:


This little guy has huge ears to listen for hungry foxes and wolves.  The blood going to warm those ears would lose all of its heat to the air without a biological energy recovery mechanism.  The animal would then get too cold to survive up North.  So the blood going to the ears in arteries passes very close to blood returning from the ears in veins.  The warm blood gives up some of its heat to the cool returning blood and thus doesn't lose it to the air.

Our house ERV works in a similar fashion.  Air is brought in from outside (cold air in winter, warm in summer) through ductwork which runs very close by the ductwork for the stale air being exhausted.  The different air streams will transfer heat between themselves.  Thus in summer the cool, but stale air being exhausted will pass by warm, but fresh air.  The fresh air will thus be pre-cooled by the stale air (and the stale air will be warmed by the fresh air).  The reverse would happen in winter.  In this fashion we are able to recover at least 70% of the energy that would be lost by this ventilation of stale air.  Pretty slick, huh?  And we learned that from a bunny rabbit!

Onward and upward,
Mark, Mark and Isabel


Friday, July 9, 2010

Up on the roof.

Up on the roof (Click here for a video), The Drifters sang it, Carole King wrote it and we can now experience it.  We were up on the roof which is now in place and took some interesting pictures.

Isabel and the other Mark watching roof truss placement
 from the yard next door.


This is what she saw, placement of the front roof truss.  Check out the Moon to the left.


The roof in its roughed-in state.


Front view from ground of roughed-in parapet wall of the roof.  
(Note:  the lower front windows will be cut with a curve just like the top ones).


The roof is built with the trusses as seen in the second photo above.  Then sheathing is put over the trusses to make a flat roof.  Those are then cover with 2" thick foam panels.  Then the whole roof surface is covered in a rubber sheathing to water proof it.  That rubber sheathing can be brought up and over roof penetrations (exhaust pipes, solar panel anchor points) for a watertight seal.  The whole roof is pitched from front to back for drainage.  Currently the gutters will empty into downspouts that are hooked up to the sewer system.  We wanted the water to go out onto the land surface or into a holding tank as a greener option.  We lost that battle with the City, but stay tuned since we are trying some other ideas.

The front of the roof then has a parapet wall around the top (actually I believe it's really called the entabliture, but you get what I mean).  This amounts to a wall around the front and part of the sides.  This is a very common design feature in this neighborhood.  We are planning it such that the solar panels will be hidden from view in the front, but not blocked so much that they don't perform well.  The parapet wall will have a design something like these pictures:


A top down view of the roof will show up when they've laid down the rubber sheathing.  This sheathing will be white and thus have a high albedo or reflectivity.  Thus it will be another feature that keeps our heat costs low and the house more energy efficient.


Onward and upward,
Mark, Mark & Isabel

To certify or not to certify. . . .

That is the question, whether 'tis nobler in the mind to suffer the loss of money in the name of enhancing the new green economy or to use that money for further project improvements.  A few green certification programs have popped up, the most widely known of which is the LEED (Leadership in Energy and Environmental Design) program from the U.S. Green Building Council.

A good example of strange certification issues came up a few weeks ago.  We were looking at windows and doors.  We have narrowed our choice to two different manufacturers.  Both are selling high level green products, including the use of recycled materials, thermal breaks, long lasting finishes, low emissivity coatings, argon gas between double panes of glass, etc.  But if we want to become LEED certified (a question very often asked of us), then we have to buy the same window, but at a higher cost to cover the expense of tracking it through the system.

Or how about this example for ramping up the frustration level:  We have frequently engaged the Amish community to custom build high quality kitchen cabinets for us.  Our intention is to do so with this house as well.  They are a local business and are arguably a very green industry (they don't even use electric lights, working only during daylight hours).  I investigated the wood they use and discovered that the mill supplying them is also considered local.  Plus that mill produces wood that is certified by the Forest Stewardship Council.  There's not much else you can do to be green on kitchen cabinets, so we were pretty stoked.  Then we found out that because the Amish woodshop itself isn't certified, the "chain of custody" is broken and we would not earn certification points for using their cabinets.

Many such issues have come up and it's exhausting to work through all of them.  The rating systems don't seem to have been fully developed for single family home projects.  Plus it's very expensive to get certified.  Expensive in that you could buy a nice used car for what it would cost to certify.

The final nail in the coffin came a couple of days ago when we discovered that with the rating system we were intending to use we would receive an overall rating equal to the rating of the lowest category.  So even though we are producing all of our own power, have high insulation and geothermal heating/cooling, we wouldn't achieve the highest rating simply because we didn't have a rain barrel.  Or because we hadn't protected sensitive habitat.  What about the fact that there wasn't ANY sensitive habitat?  An empty city lot with weeds and bush honeysuckle is not sensitive habitat.

We understand that with certification systems in good working order you can develop standardized measures of a home's quality.  This helps consumers compare builders and gives you confidence that you are really building a green home.  We eventually realized that we already have that confidence in our builder and the rating system guidelines are available on the web.  We actually went through a whole scoring tool and rated the project ourselves.  By doing this we could easily see where we needed improvement and can discuss that with our trusted builder.

It began to seem like we were only rating the project so we could show off a fancy certificate.  Our egos aren't worth spending several thousand dollars.  So we have concluded that we will do what is called a HERS rating (Home Energy Rating).  This is the basis of all the certification systems and is a measure of a home's energy efficiency as compared to a standardized home.  It is easily done and costs just a few hundred dollars.  Ultimately, our energy bills will also serve as a certification that we did a good job.  For other green concerns, such as landscaping, we have many resources available in St. Louis to help us do the green thing.

Sorry there aren't any pictures, see the next posting.

Onward and upward,
Mark, Mark and Isabel

Tuesday, June 29, 2010

Second floor goes up

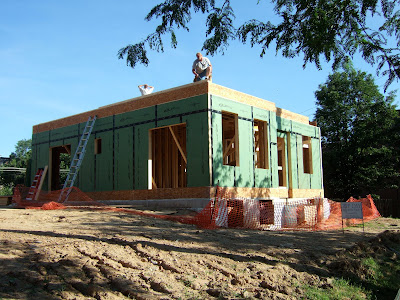
By the end of last week the second floor was in place.  The interior is also framed out.  You will notice that the upper windows have a curve cut in them and the lower ones do not.  This is the only error made in the whole process and it is easily corrected.  At some point in the future, the first floor windows will also have a curve to them.  It's essential because of the general look of the front facade and because we ordered the windows with a curved top.  And they are fracking expensive.  I mean really expensive.  If you add the cost of all the windows together, we could easily afford a very nice BMW.  As they get installed I'll talk about the design and functioning of the windows.

View of second floor almost completed.


View of second floor from next door roof.  The interior walls aren't quite 
finished in this picture and the Zip system green walls still need the black tape to seal the seams.

Other exciting news is that we've been shopping for interior fixtures and have made a few decisions.  It really is like pulling teeth.  Even in the eco-friendly world there are many choices as well as items that distract you with not-quite-true claims of greenness.  This is known as greenwashing (as in brainwashing) and it will make you crazy.  We also purchased a couch, chair and ottoman (how did Turkish people have their name associated with a piece of furniture?).  We purchased these living room items at Crate & Barrel. Now before you say, "oh look, another two Gay guys buying furniture at C & B", let me tell you that we got them on sale and they are eco-friendly furniture.  The wood frames are made from wood gathered from sustainably grown forests and the padding is made from soybeans and corn (don't know how, but it feels great).

Next step in the building process is to put up the roof.  The trusses are due to arrive on Wednesday this week, so look for us to be under roof soon.

Onward and upward,
Mark, Mark & Isabel

Thursday, June 24, 2010

I can't keep up!

I promised to post a picture every so often to show the progress of the framing crew from Gerard Branson, Jr. Construction.  Well, I can't keep up with them.  They're out in 100 degree weather and I can't keep up with posting pictures fast enough from my air conditioned office.  The work is high quality and surprisingly fast.  I would say they're working like a dog, but from what we see in our household, a dog's "work" amounts to 30 seconds of barking at the mail deliverer from the back of the couch in an air conditioned room!  So I've decided to post a series of pictures every few days.  Here's the first batch:


Installation of the band board prior to putting up the first floor walls.


First floor walls being placed.


Completed first floor walls.


Installation of band board for second floor walls.


Laying down of the second floor (really the subfloor).


All of the work seen in the pictures above took place in only FIVE working days.  Today is the 6th working day and they should have most of the second floor walls up.  Tomorrow will then have them putting up the interior walls on the second floor (the first floor interior is already done though not obvious from the pictures).  More pictures to come.

You will notice that again our house is very literally green.  The walls are still an oriented strand board (OSB) like the floors, but they are also coated with a water resistant barrier.  The black lines on the green boards are tape that seal the seams between boards giving us enhanced wind protection.  This product is part of the energy efficiency barrier we're trying to create around the house and is recommended by the EnergyStar program.  Other ideas yet to come include thicker walls, spray foam insulation and blown-in cellulose insulation.  You won't see the Tyvek house wrap that normally goes around new homes because this product eliminates the need for it.  If you want to know more, check out this website:  Zip System wall panels  They have a pretty good, though slightly cheesy video.

The other interesting thing that happened today was that a reporter came to interview us about the project.  She's from an internet-based local news site.  So even our interview will be environmentally friendly since it won't be printed!  Janette's news site is called Your Local Messenger and their website is: Your Local Messenger


Onward and upward,
Mark, Mark & Isabel

Monday, June 21, 2010

The first floor is down!

We've been to lots of places in Europe, the United States and China, but no monument was as gratifying and wholly beautiful as this:


Construction of the first floor showing the floor joists in place.


The first floor completely lain down.  Beautiful.

It looks small, doesn't it?  One of our goals was to make a house that was not too large for two people and whatever menagerie of animals we end up with.  We actually started this project shooting for a 1600-1800 square foot house.  However, many factors, such as the 2-story requirement in this neighborhood and the fact that we wanted to have larger doorways and hallways to make the house more accessible as we age, forced us to build a larger house.  We are coming in at 2300 square feet which should be enough space to keep peace and harmony in our lives.

The other green aspect of framing the house concerns the materials.  The wood itself is a product called AdvanTech which is oriented strand board (OSB).  This literally means it is made of strands or small pieces of scrap wood that are oriented in the same direction.  These strands are adhered together with adhesives in a process similar to how plywood is made.  After years of use OSB has proven to be as durable as plywood.  The wood used to make OSB is scrap or low value species of trees.  It is considered to be an excellent wood product to use in green building.  The AdvanTech product was awarded the National Association of Home Builders Research Center Green Approved rating for subflooring.  It is thus eligible to earn points that contribute toward the NAHB Green Building Standard certification.

Here's an article in EcoHome magazine on wood flooring products:
EcoHome article on wood flooring products


The next step is the framing of the walls which should start soon.  We plan to take a picture daily from the same location to show the progress of the framing.

Jason has chosen to use Gerard Branson Jr Construction Company to do the rough wood framing work and so far they have worked in driving rain and blazing heat.  If it should snow I'm sure their dedication will have them out their in parkas framing up our house.  Thanks to J.R. and his crew from Gerard Branson Jr Construction Company.

Onward and upward,
Mark, Mark & Isabael